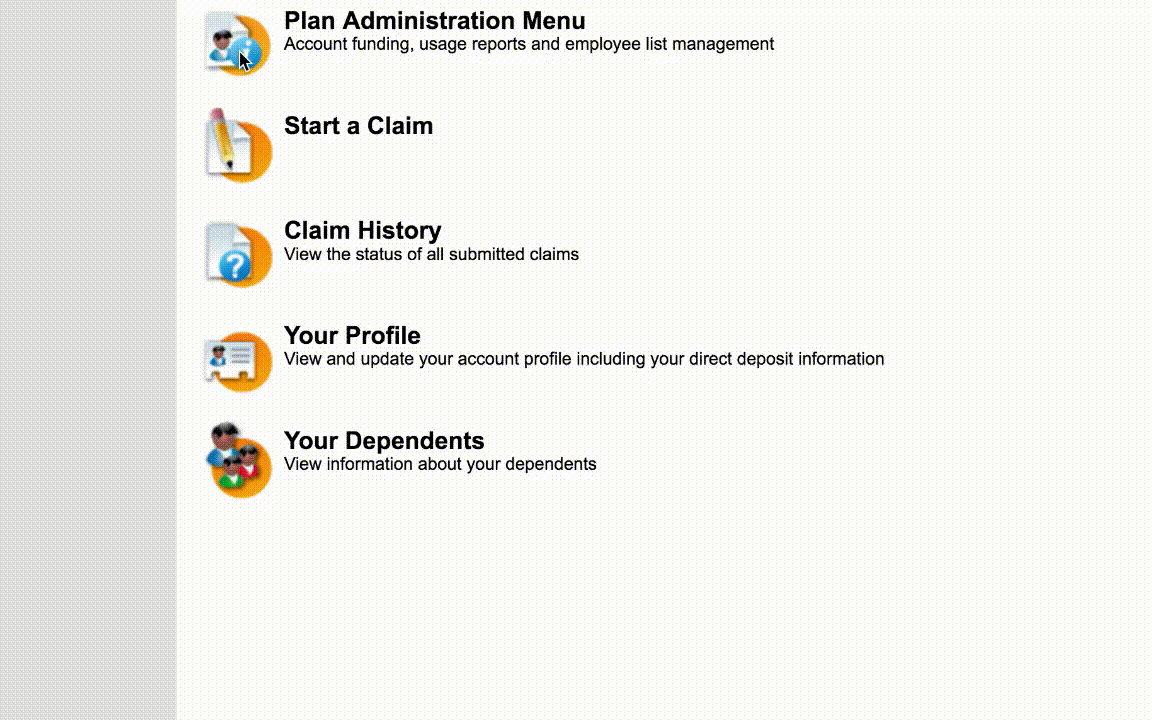
1. Login and go to "Plan Administration Menu" and then click on "Edit/Enter Employee Information"
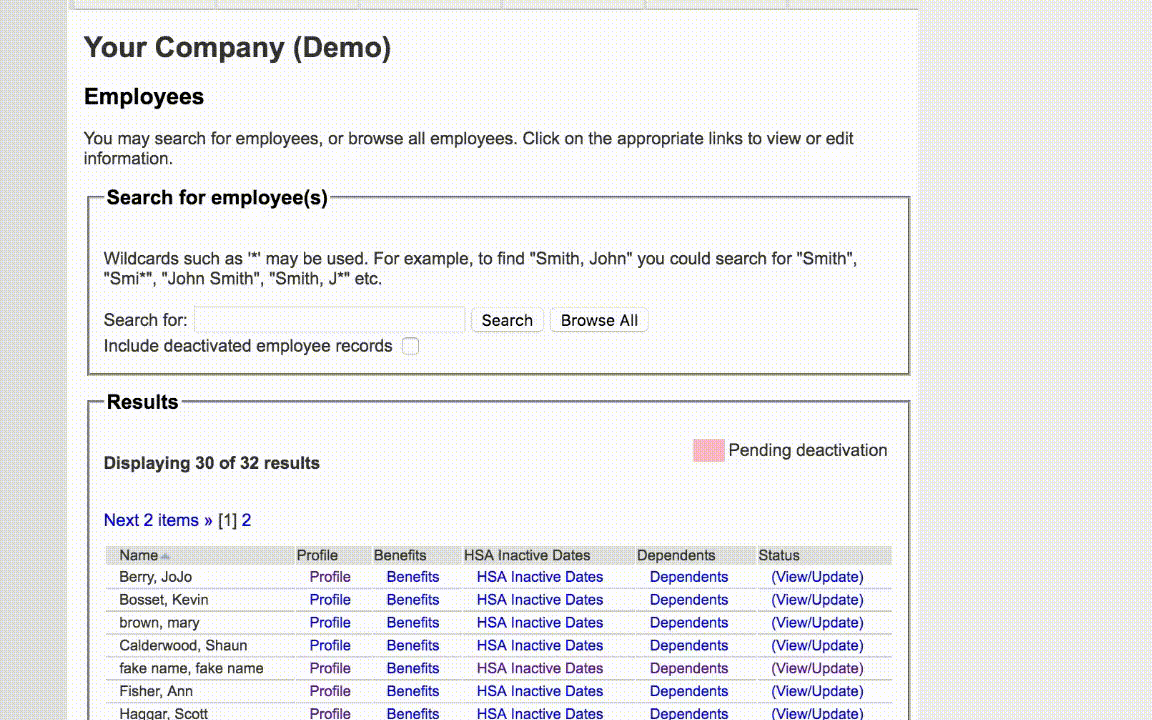
2. Scroll to the bottom of the screen, and click on "Add Employee"
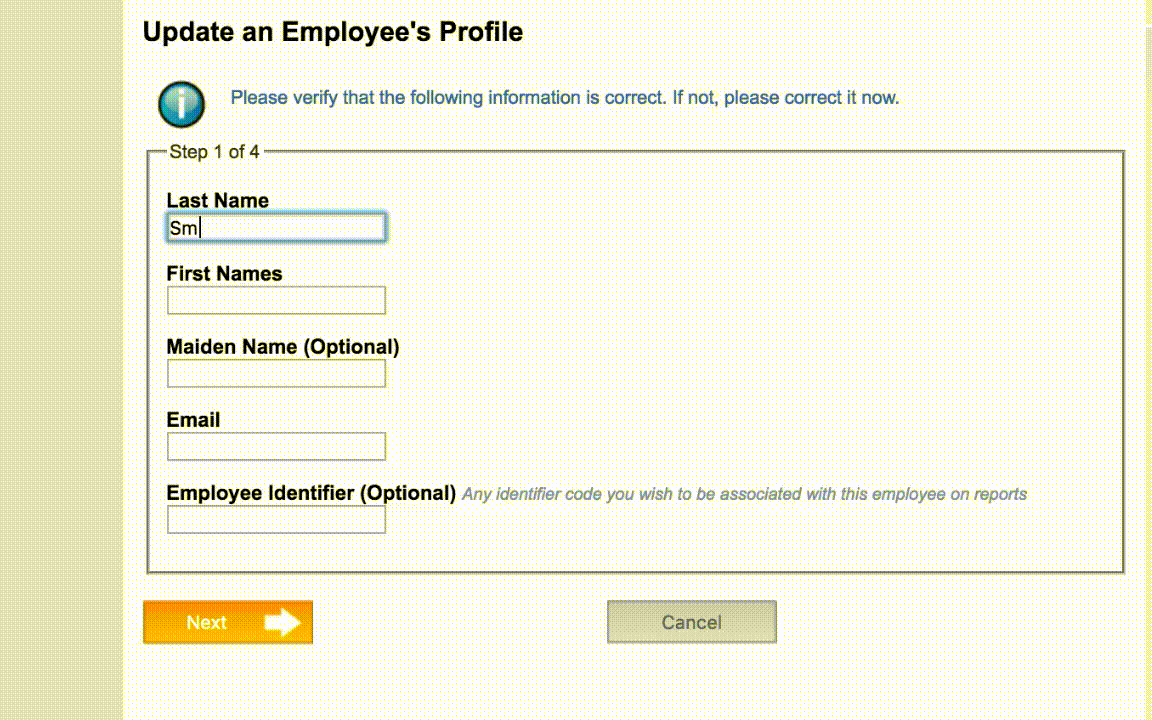
3. Enter in the employee's name, email address and maiden name (as needed).
Note: This is an important step. The names on the employee's receipts must match the names on the system for claims to get approved. You are encouraged to enter in alternative nicknames in brackets for your employees when necessary.
This email address will be used to communicate with the employee about their account.
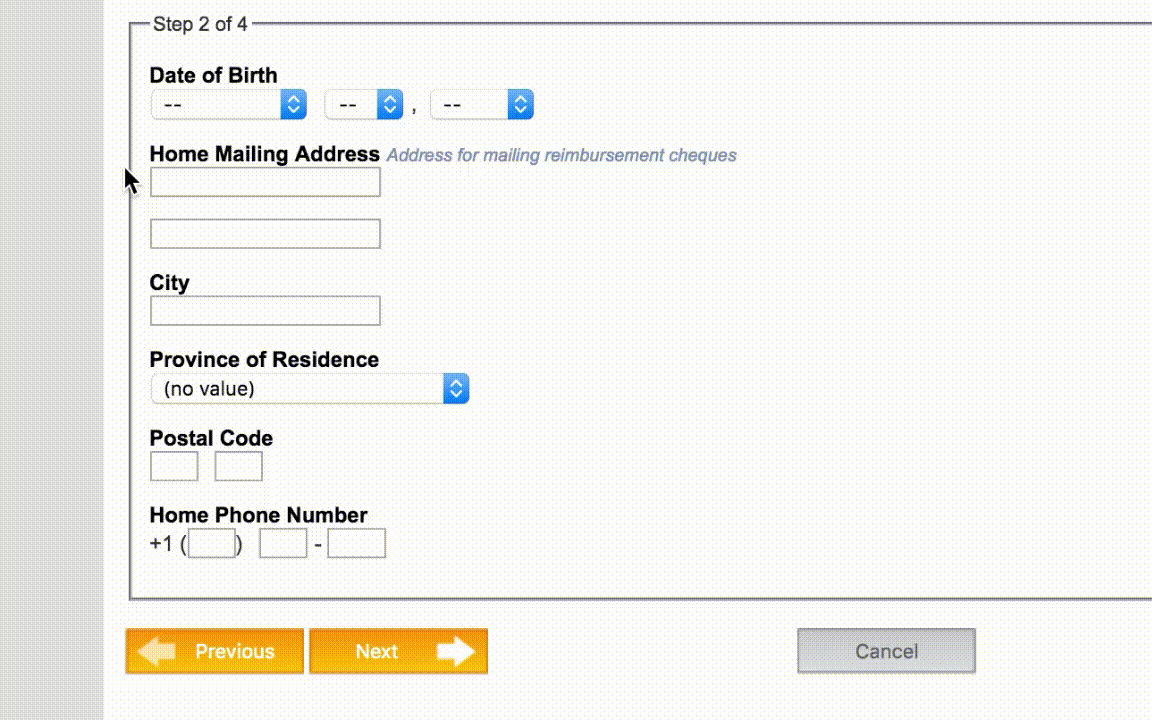
4. Enter in the employee's date of birth. You are also able to add their address and phone number, although this is not required as employees are prompted to enter it in when they first log in.
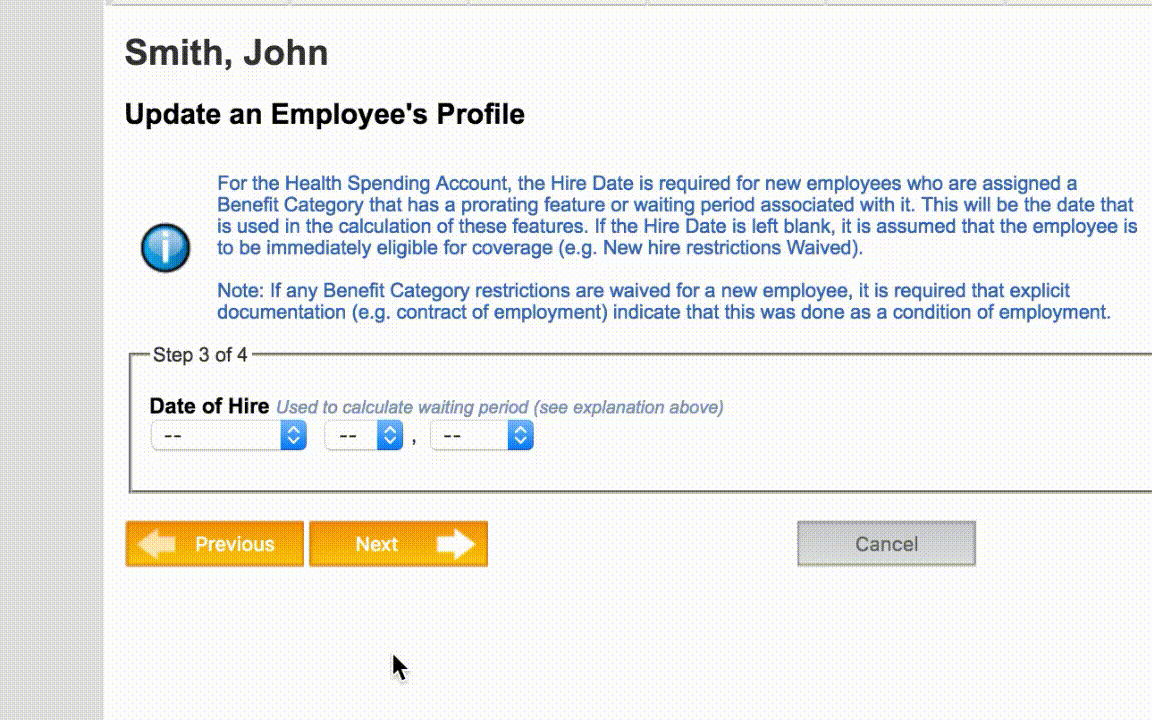
5. Enter in the employee's hire date
Note: This is important in figuring out the benefit start date and limit for the employee.
If you have a waiting period and/or pro-rating enabled, then this date will be used to determine when the employee's benefits start and the limit they will get until the benefits reset at year-end.
If you leave this section blank (with no hire date) BOTH the waiting period and pro-rating will will waived. This will give your employee access to the benefits right away and a full yearly limit. Click here to learn more about this.
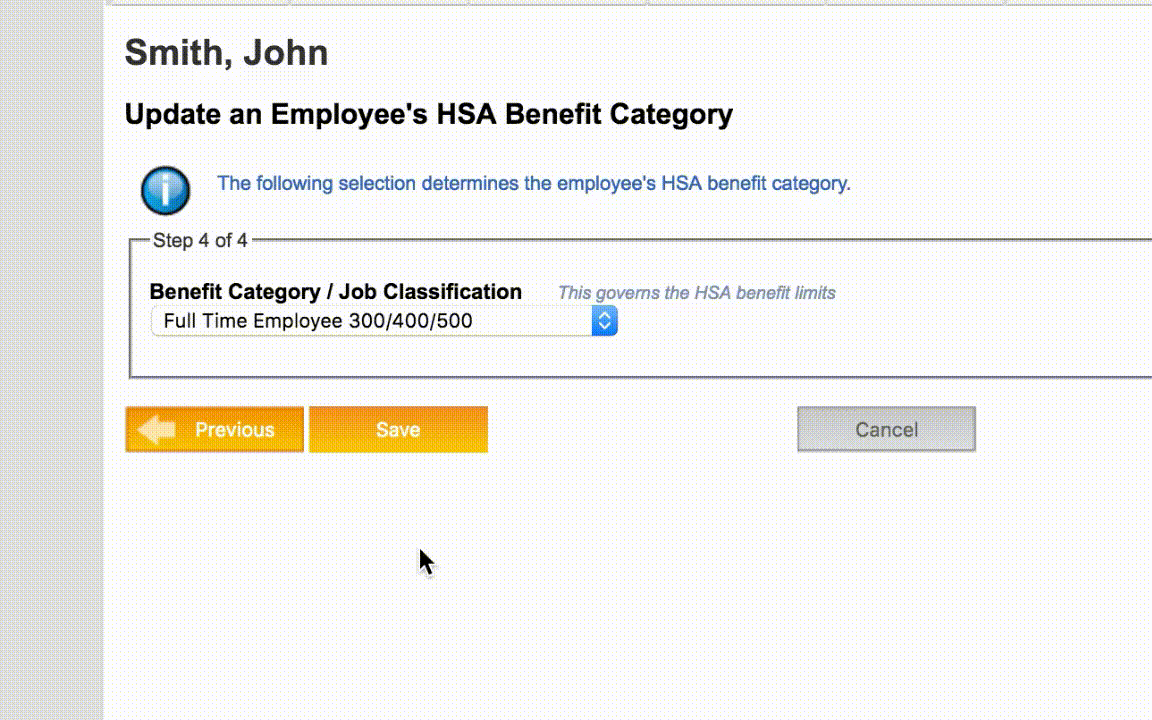
6. Place your employee in the appropriate benefit category, using the dropdown menu.
Note: if you do not see the correct benefit category showing, click here for instructions on how to add it.
7. Click 'Save' to finalize. Then enter your employee's dependents into the system if the benefit extends to them. Click here for instructions on that.
Adding an employee (Lifestyle/Wellness Spending Account)
1. Login and go to "Plan Administration Menu" and then click on "Edit/Enter Employee Information"
2. Scroll to the bottom of the screen, and click on "Add Employee"
3. Enter in the employee's name, email address and maiden name (as needed).
Note: This is an important step. The names on the employee's receipts must match the names on the system for claims to get approved. You are encouraged to enter in alternative nicknames in brackets for your employees when necessary.
This email address will be used to communicate with the employee about their account.
4. Enter in the employee's date of birth. You are also able to add their address and phone number, although this is not required as employees are prompted to enter it in when they first log in.
5. Enter in the employee's hire date
Note: This is important in figuring out the benefit start date and limit for the employee.
If you have a waiting period and/or pro-rating enabled, then this date will be used to determine when the employee's benefits start and the limit they will get until the benefits reset at year-end.
If you leave this section blank (with no hire date) BOTH the waiting period and pro-rating will will waived. This will give your employee access to the benefits right away and a full yearly limit. Click here to learn more about this.
6. Place your employee in the appropriate benefit category, using the dropdown menu. This benefit category may also reflect Health Spending Account benefits, if the employee is being given those.
Note: if you do not see the correct benefit category showing, click here for instructions on how to add it.
7. Click 'Save' to finalize.
8. To enter in the employee's Lifestyle/Wellness Spending Account credits, go back to the main menu. Click on 'LSA Benefit Categories.'
You will be presented with the following chart. You are able to click into it and adjust employee LSA credits as needed.
There are two columns that you can use to enter an amount. Read the differences below and pick one to enter in the limit.
a)Annual Limit (blue arrow):Use this column to enter in the total yearly benefit limit. Our system will automatically take into account waiting period and pro-rating (if applicable) and display the actual limit the employee gets that year under 'Total Granted'
b)Total Granted (green arrow): Use this column to enter the final limit you want the employee to have for the given benefit year. It will automatically calculate backwards the 'Annual Limit' (if it is different, based on new hire conditions).
Finally, enter your employee's dependents into the system if the benefit extends to them. Click here for instructions on that.
Adding an employee (Flexible Spending Account)
You have a flex account if you:
Are offering your employees both a health spending account and a lifestyle spending account. If employees get to choose how to allocate their total benefit dollars between the two options (and possible others) at the beginning of each new year.
(For example: a full-time employee is choosing how to split their $500 between a health spending account and a lifestyle spending account).
Here is how you add a new employee to a flex account:
1. Go towww.healthclaim.ca, login to your account and go to 'Plan Administration Menu.' Then click on 'Edit/Enter Employee Information.'
2. Scroll to the bottom of the screen, and click on 'Add Employee'
3. Enter in the employee's name and email address.
Note: This is an important step. The names on the employee's receipts must match the names on the system for claims to get approved. You are encouraged to enter in alternative nicknames in brackets for your employees when necessary.
This email address will be used to communicate with the employee about their account.
4. Enter in the employee's date of birth. You are also able to add their address and phone number, although this is not required as employees are prompted to enter it in when they first login.
5. Enter in the employee's hire date
Note: This is important in figuring out the benefit start date and limit for the employee.
If you have a waiting period and/or pro-rating enabled, then this date will be used to determine when the employee's benefits start and the limit they will get until the benefits reset at year-end.
However, if you leave this section blank (with no hire date) BOTH the waiting period and pro-rating will will waived. This will give your employee access to the benefits right away and a full yearly limit. Click here to learn more about this.
Important:
6. Place your employee in the DEFAULT 0/0/0 category using the dropdown menu.
Enter in the employee Flex Dollar Base Amount.This is the total amount of credits they have available and are able to split. Do no worry about pro-rating the total limit or about a new hire waiting period. Our system will automatically pro-rate and adjust the total benefit limit as needed.
Click Save to finalize.
That's it!
National HealthClaim will send a selection email to the employee. In their email, they will be able to allocate their credits.
If the employee does not make their selection before their standard two week deadline, they are given a default split.
Make sure to enter your employee's dependent information into the system if the benefit extends to them. Click here for instructions on that.
Summary
This article shows you how to add a new employee to the account.
Add a new employee
1. Log in and click on the "Employees" tab.
2. Click on the blue "+ Add employee" button.
3. A pop-up window will appear. Enter in the employee’s information.
Required fields for entry are: First name, last name, email, date of birth, hire date, benefit category, and waiting period months.
Optional fields for entry are: Nickname, maiden name, and dependent information. Please note, the names on the employee's receipts must match the names on the system for claims to get approved. You are encouraged to enter nicknames or maiden names as needed, along with dependent information. These can be added in brackets in the appropriate field: eg, Thomas (Eric) Smith, or Mary Brown (Hamilton).
4. Once you hit "Save," a second pop-up window will appear.
The system will calculate the employee’s start date based on Hire Date and Waiting Period you previously entered. As a plan administrator, you are able to override this date by clicking a check mark, and entering in your own desired start date for the employee. This date is important because it determines the start of their benefits. Only eligible expenses incurred on or after this date are reimbursable.
For detailed information on how Hire Date, Waiting Period and Pro-rating work together, click here.
5. After clicking the blue "Finish Employee Add" button, the system automatically brings up another pop-up window in case you need to add another employee.
However, if you are finished adding employees, click on "Cancel."
That's it!
To review the employee you just added, click on their name in your employee list.
Under their section you are able to:
Complete their profile, although this is not needed as employees are prompted to enter their address and phone number on their own portal.


Comments
0 comments
Article is closed for comments.